
Quick Guide: Fire Rated Wall Assembly Drywall Takeoff
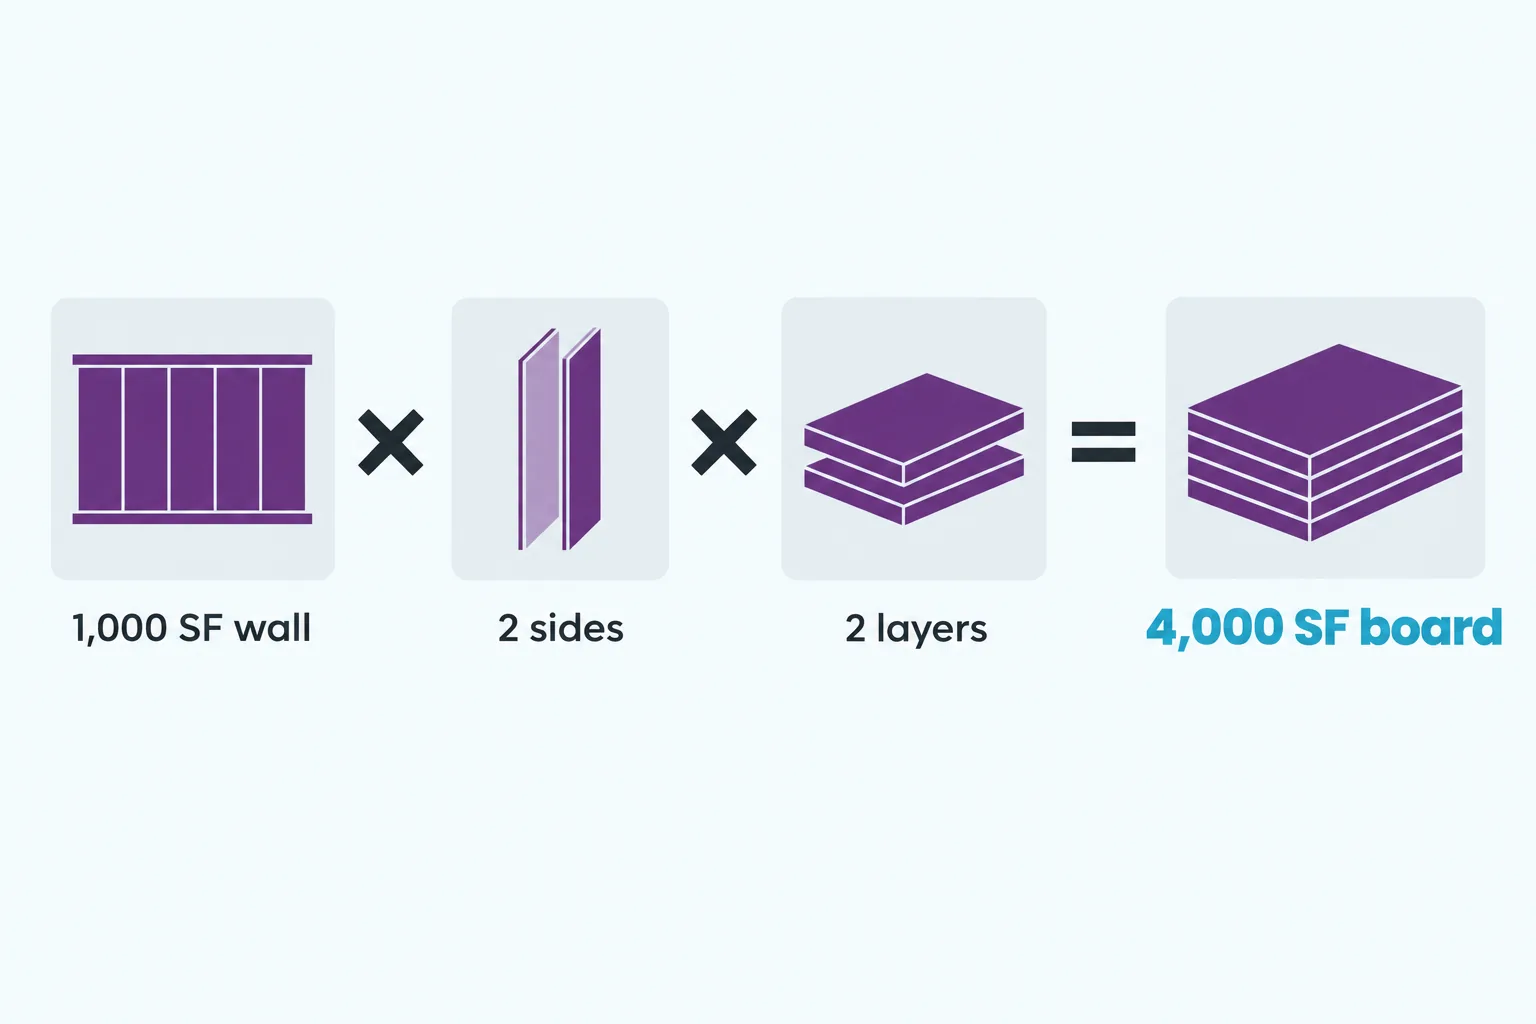
A fire rated wall assembly drywall takeoff identifies each rated wall type in the project documents, measures its area and layers, and keeps its materials and labor separate from standard partitions. The assembly’s listed design, not a generic layer-count rule, sets the required components. Use the summary below to check what to find before measuring and pricing the work.
This guide supports estimating. Confirm the project’s adopted code, specifications, and exact assembly listing before finalizing quantities or substitutions.
| Question | Short Answer | Where It Hits the Takeoff |
|---|---|---|
| What is a rated wall assembly? | A tested construction system with a fire-resistance rating | Track each assembly as a separate quantity line |
| What gives the wall its rating? | The tested assembly, built according to its listing and permitted options | Check proposed substitutions against the design and obtain required approvals |
| How many board layers? | The listed design specifies the board type and layer count; common assemblies are examples only | Multiply area by sides and layers to calculate board square footage |
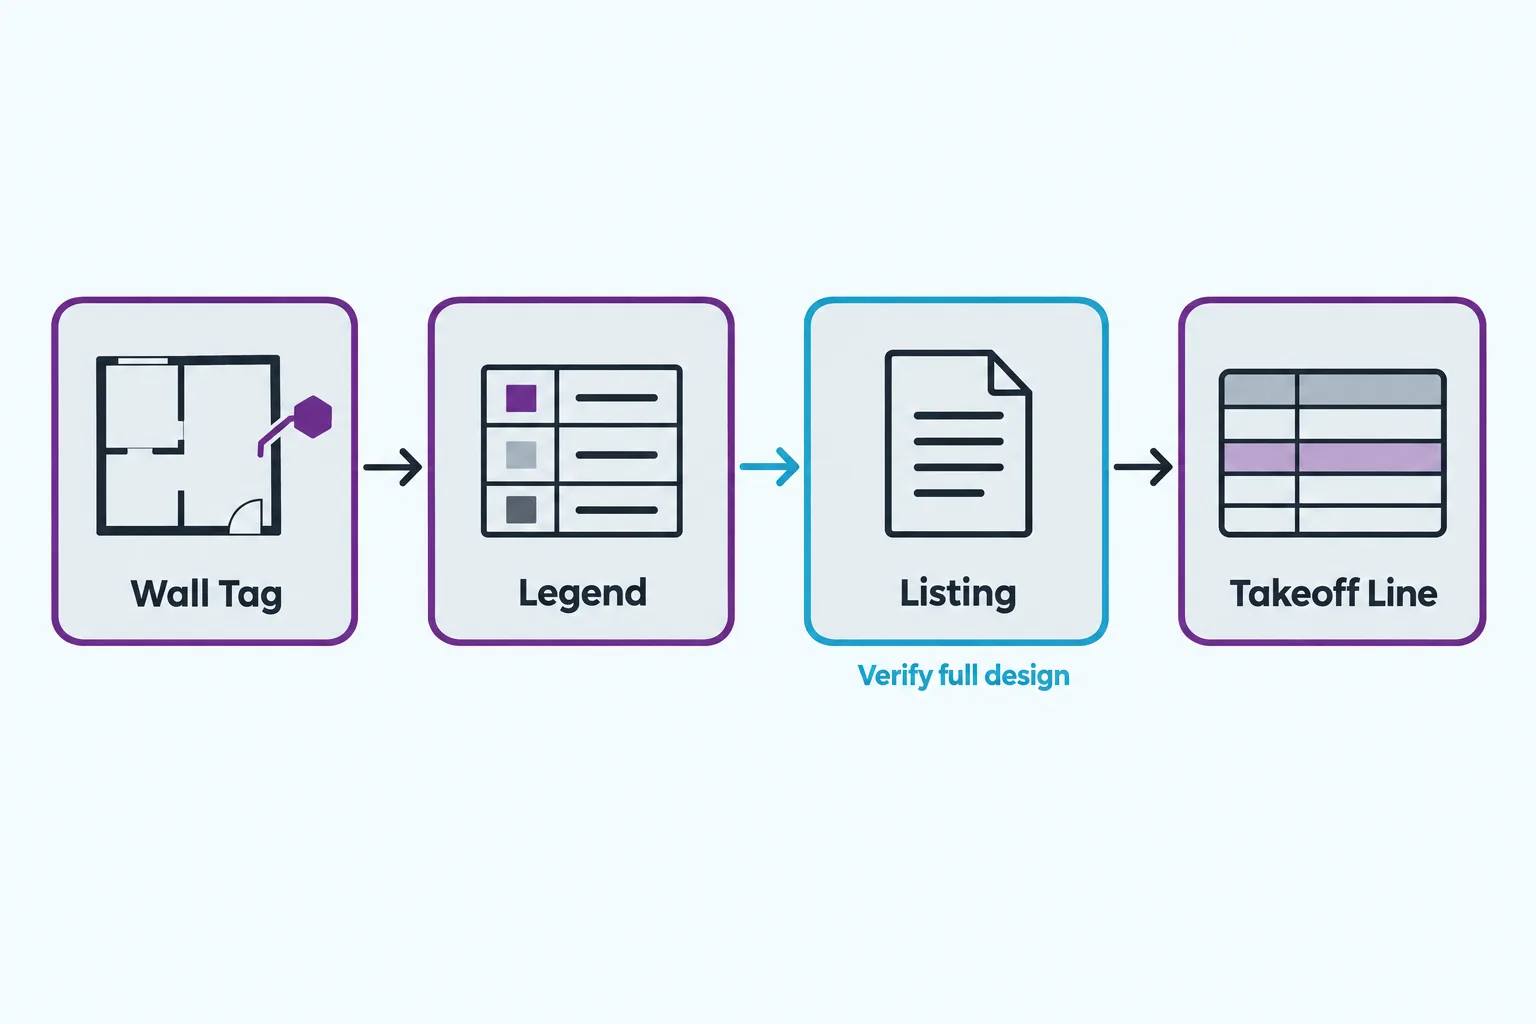
| Where does the design number live? | Wall legend, wall type schedule, life safety plan, and the gypsum board specification section | Read it before a single measurement is taken |
| What can change the takeoff? | Layer count, wall height, specified joint treatment, access, and listed components | Price each assembly from its documents and project conditions |
What Is a Fire Rated Wall Assembly?
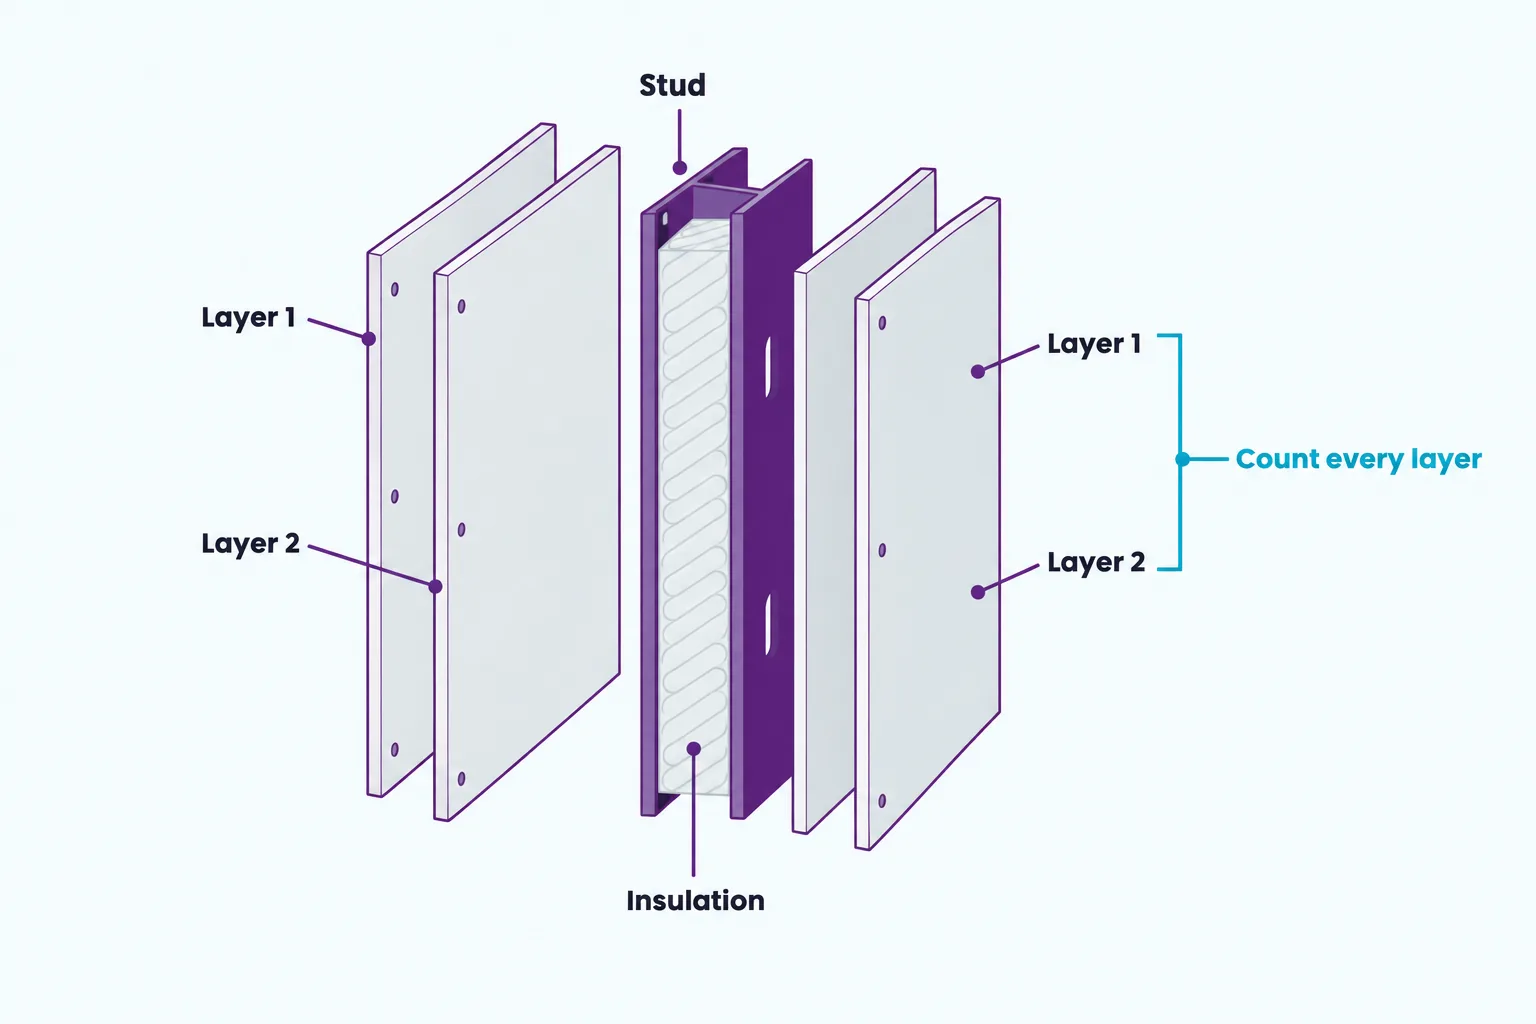
A fire rated wall assembly is a construction system evaluated for fire resistance under a standard test method. Its published design identifies the components and conditions that apply, such as framing, board type and thickness, layer count, fasteners, joint treatment, and, in some designs, cavity insulation. Follow the design’s stated requirements, options, and permitted variations.
The rating applies to the assembly rather than to a board in isolation.
Use the listed design to verify which products and construction details are required. Some designs allow stated options or variations; route other proposed substitutions through the design professional and authority having jurisdiction before pricing or installation.
A fire-resistance rating describes how long an assembly met the applicable performance criteria in a standard test. It does not mean that the wall is fireproof or that it will perform identically in every real-world fire.
For takeoff purposes, track each rated assembly as a separate quantity line. A project with four wall types may require separate material and labor allowances for each, based on the listed scope and your production data. This supports an accurate commercial drywall estimate and makes differences between assemblies easier to review.
| Assembly Component | Role in the Rating | Takeoff Consequence |
|---|---|---|
| Framing member | Sets the tested stud size, gauge, and spacing | Framing quantities change with spacing, and spacing changes fastener counts |
| Board type and thickness | Specified products and thickness form part of the assembly | Price and source the exact product named in the design |
| Layer count per side | Contributes to the performance of the listed assembly | Multiplies board area and affects hanging labor |
| Fastener pattern | Specified fasteners and spacing secure the board layers | Count and price fasteners according to the listing |
| Joint treatment | Treats joints as required by the assembly design | Include base-layer joint treatment only when the design or specifications require it |
| Cavity insulation | Required in some listed designs only | An easy scope item to miss when the legend text is small |
How Fire Ratings Get Assigned: Test Standards and UL Design Numbers
Fire-resistance ratings are established through standardized tests such as ASTM E119 and UL 263, as applicable to the design and listing. These standards evaluate assemblies; the design documents identify the construction associated with a rating.
A design or listing number points to the assembly requirements and any stated options. Wall designs may appear in different series, so use the number shown in the drawings to find the exact listing in UL Product iQ or the manufacturer’s assembly library. Verify the full design rather than inferring details from the number alone.
Some codes provide prescriptive fire-resistance methods in addition to listed designs. If drawings show a rated wall without a design number, check the code summary, specifications, and adopted code edition before deciding whether clarification is needed. If those documents do not establish the assembly, submit an RFI rather than filling in the missing design yourself.
| Source Document | What It Tells the Estimator | What It Does Not Tell You |
|---|---|---|
| Wall type legend | Wall tag, rating, design number, stud size, layers per side | Where each tag actually occurs on the floor plans |
| Life safety plan | Which walls are rated and which category they fall under | Board type, layer count, or construction detail |
| Wall type schedule or details | Assembly section, board thickness, height termination | Field conditions that force deviation |
| Gypsum board specification | Board products, finish levels, joint treatment requirements | Quantities of any kind |
| Code summary sheet | Construction type, occupancy separations, required hours | The tested design that satisfies those hours |
Type X vs Type C Drywall, Thickness, and Board Selection
Type X board appears in many rated wall designs, often at 5/8 inch thickness, but the required product and thickness depend on the assembly. Check the product designation and thickness shown in the listing and project documents rather than treating either as a default.
Type C is an enhanced fire-resistant board designation used in some listed assemblies. Product formulations and substitution allowances vary by manufacturer and design. If a listing specifies Type C, do not assume Type X is an acceptable substitute; check the listing and obtain approval for any proposed change. For examples of manufacturer-specific allowances and base-layer joint-treatment guidance, consult National Gypsum’s fire-rated assembly FAQ, then follow the project’s actual listing and specifications.
Thickness also needs to match the design. Some listed assemblies use 1/2-inch Type X; others specify 5/8-inch or a different product. Verify the exact thickness in the listing and wall schedule before calculating quantities.
Track shaft-wall systems separately. Identify the liner panel, listed framing components, face layers, and installation sequence from the design; do not combine them with a standard partition allowance.
| Board Type | Typical Thickness on Commercial Work | Where It Appears | Relative Cost Effect on the Takeoff |
|---|---|---|---|
| Standard gypsum board | As specified for non-rated work | Non-rated partitions and ceilings | Use current supplier pricing |
| Type X | As specified; many listed designs use 5/8 inch | Rated assemblies whose listings name Type X | Verify product price and availability with suppliers |
| Type C | As specified in the listed design | Assemblies that name a Type C product | Confirm current product pricing and availability with suppliers |
| Shaft-wall liner panel | As specified in the listed design | Shaft-wall systems that name a liner panel | Track as a separate material and labor scope |
How Many Layers of Drywall for a 1-Hour vs 2-Hour Fire Rating?
Some common non-load-bearing steel-stud designs use one layer of 5/8-inch Type X on each side for a 1-hour rating or multiple layers for a 2-hour rating. These are examples, not estimating defaults. The wall’s listed design and project documents determine the actual board, layers, framing, and fasteners.
Several wall families break the pattern. Area separation walls, shaft walls, and column enclosures reach their ratings through construction that looks nothing like a doubled partition. Some designs hit two hours with a single face layer combined with other tested components. Read the design, then count the layers.
Layer count changes board quantities and labor. Base-layer joint treatment is required only when the listing or project documents call for it; the face layer receives the specified finish scope. Do not assume either that every layer gets a full finish or that every base layer requires fire taping.
| Rating | Typical Stud Wall Buildup | Board SF per SF of Wall | Finish Notes |
|---|---|---|---|
| Non-rated | One layer per side | 2.0 | Face finish per specification, both sides |
| 1 hour | Some designs use one layer of 5/8-inch Type X per side; verify the listing | 2.0 for this example | Apply finish scope as specified |
| 2 hour | Some designs use two layers of 5/8-inch Type X per side; verify the listing | 4.0 for this example | Apply base-layer treatment and face finish as specified |
| Shaft wall | Liner panel plus face layers on the accessible side | Varies by design | One-sided access changes both sequence and rate |
How Wall Type and Required Continuity Affect the Takeoff
Building codes distinguish fire walls, fire barriers, fire partitions, and smoke barriers. The required rating and continuity depend on the wall’s function, occupancy, adopted code edition, and project documents. Those requirements affect measured height and scope, so verify them against the code summary and details.
Wall termination can materially change the measured area. Some rated walls extend to the structure; others may terminate at a rated horizontal assembly or another condition permitted by the adopted code and shown in the project documents. For example, a wall measured to a 9-foot ceiling instead of a 14-foot deck would omit 500 square feet over a 100-foot run. Verify the specified termination before measuring.
Head-of-wall joints, penetration firestopping, and other rated joint systems may be separate scope items or assigned to another trade. Confirm responsibility in the specifications and proposal so the estimate states what is included and excluded.
| Wall Category | Rating | Continuity/termination | Takeoff flag |
|---|---|---|---|
| Fire wall | Rating varies by code and project | Use the continuity and termination shown in the adopted code and project details | Verify structural and architectural details |
| Fire barrier | Rating varies by application | Confirm continuity and termination in the code and details | Do not default to deck or grid height |
| Fire partition | Rating varies by application | Some conditions permit termination at a rated horizontal assembly | Confirm the specific condition and detail |
| Smoke barrier | Rating and continuity vary by application | Follow the adopted code and project details | Clarify joint and penetration scope |
Confirm every category and hour count against the project code summary. Occupancy drives the requirements, and corridors, stairwells, shafts, demising walls, and tenant separations are where rated construction concentrates.
How to Read Plans and Wall Legends to Find Every Rated Assembly
Most takeoff errors on rated work happen before the first measurement, during the read. Build a wall type matrix first. One row per wall tag, with columns for rating, design number, stud size and gauge, stud spacing, layers per side, board type, insulation, and height termination. That matrix becomes the spine of the quantity file and the reference document for every RFI.
Cross-check the life safety plan against the floor plans next. If the life-safety hatching and architectural wall tags conflict, record the discrepancy and request clarification; do not assume which document controls or which direction the quantity changes. Verify that each wall tag in the legend appears on the plans, and flag legend entries with no plan occurrence for review.
| Plan Element | What to Extract | Common Conflict to Flag |
|---|---|---|
| Wall legend | Assembly makeup, rating, design number | Legend revised, plan tags not updated |
| Floor plan tags | Location and linear run of each type | Tag changes mid-run with no break shown |
| Life safety plan | Rated corridor, shaft, and separation lines | Hatch pattern covers walls tagged as non-rated |
| Sections and details | Height termination and head-of-wall condition | Detail shows deck; plan note says ceiling |
| Specification section | Board products and finish levels | Specified board type absent from the legend |
Consider an RFI when the documents do not establish the assembly, when rated construction appears on only one side of a wall, or when the rating changes along a continuous run without a clear transition detail.
Step-by-Step Fire Rated Wall Assembly Drywall Takeoff
With the matrix built, the measurement sequence turns mechanical. Keep each wall type on its own layer or color in the takeoff software so quantities never merge. For the broader measurement workflow, see Quantify’s drywall takeoff guide.
Related readingEfficient Drywall Takeoff Mastery GuideRead the guide →| Step | Action | Watch For |
|---|---|---|
| 1 | Segregate walls by tag before measurement begins | Rated and non-rated runs measured into one bucket |
| 2 | Measure linear feet per wall type at scale on its own layer | Mixed scales between sheets |
| 3 | Convert linear feet to wall square feet using true height | Ceiling height used in place of deck height |
| 4 | Multiply by number of sides and by layer count | Second layer buried in small legend text |
| 5 | Convert board square feet to sheet count by sheet size | Sheet length mismatched to wall height |
| 6 | Add waste based on height and joint stagger | Face layer joints offset from base layer joints |
| 7 | Quantify the components required by the design and scope: fasteners, joint treatment, bead, channel, insulation, and other listed items | Do not carry a generic non-rated allowance |
| 8 | Build labor hours separately for base layer and face layer | One blended rate applied to both |
Use these formulas as a quantity check:
- Wall area = wall length × measured wall height.
- Board area = wall area × number of covered sides × number of layers on each side.
- Sheet count before waste = board area ÷ coverage area per sheet.
Use the layer count, side coverage, board dimensions, and waste allowance shown or justified for the project. Where an assembly is asymmetric, calculate each side and layer separately instead of multiplying by a single average.
A worked comparison shows why segregation matters. Take the same 100 linear feet of wall at a 12-foot deck height, measured once as a 1-hour assembly and once as a 2-hour assembly, with 4 by 12 sheets at 48 square feet each. Waste percentages below are illustrative assumptions, not published figures.
| Quantity | 1-Hour Assembly | 2-Hour Assembly |
|---|---|---|
| Wall square feet | 1,200 | 1,200 |
| Sides x layers | 2 x 1 | 2 x 2 |
| Board square feet | 2,400 | 4,800 |
| Sheets before waste | 50 | 100 |
| Waste allowance assumed | 10 percent | 12 percent for stagger |
| Sheets to buy | 55 | 112 |
| Hang hours | Apply the crew’s rate to 2,400 SF | Apply separate base- and face-layer rates; include joint treatment only if required |
Substitute project-specific waste and production assumptions before pricing. The example shows how the same wall length can require different board quantities when the listed layer count changes; it is not a universal labor or waste allowance.
What Rated Assemblies Add to Material and Labor Cost
Rated assemblies can change material, labor, and access costs through board type, layer count, specified joint treatment, wall height, and site conditions. Include each item only when the assembly design, project documents, or trade scope requires it.
Compare actual supplier quotes for each specified board product. For labor, separate base- and face-layer work where your crew history supports different production rates, and include joint treatment only when required by the design or specifications.
A single blended rate can misprice assemblies with different layer counts, board types, heights, or joint-treatment requirements. Build rates from comparable project history and the listed scope. Use the crew’s historical labor cost to hang and finish drywall, tracked per square foot, with separate rates for base layers, face layers, and access conditions where your data supports it.
| Cost Element | 1-Hour Assembly | 2-Hour Assembly | Why the Delta |
|---|---|---|---|
| Board material | Price the specified product using a current quote | Quantity follows the listed layer count | Layer count multiplies board area |
| Hanging labor | Single operation per side | Two operations per side | Base layer plus face layer |
| Joint-treatment and finish labor | As specified for the assembly | As specified for the assembly | Do not assume base-layer fire taping; verify the listing and scope |
| Fasteners | Count by listed type and spacing | Count by listed type, length, and spacing for each layer | Use the exact assembly requirements |
| Access and height | Use specified wall termination and actual access conditions | Use specified wall termination and actual access conditions | Price measured height and access, not assumed height |
Common Mistakes on Rated Wall Takeoffs
| Mistake | How It Shows Up in the Bid | Correction |
|---|---|---|
| Rated walls measured to ceiling height | Wall square footage short by the plenum depth | Take heights from sections, not reflected ceiling plans |
| Second layer missed | Board quantity may be undercounted on multi-layer assemblies | Record layers per side in the wall type matrix first |
| One-side-only rated construction ignored | Sequence and access priced as two-sided work | Flag single-sided conditions during the plan read |
| Shaft wall treated as standard partition | Liner panel and J-track dropped entirely | Price shaft wall as its own assembly with its own labor |
| Base-layer joint treatment omitted where required | Finishing scope may be undercounted | Check the listing and specifications; include only the required treatment |
| Two hours assumed to mean two layers | Quantity wrong in both directions across the project | Read the listed design for each tag |
| Head-of-wall and firestopping left vague | Scope assigned at buyout by default | State the position in writing on the proposal |
Each of these surfaces later as an unpriced change or an absorbed cost. Tracking them against your own historical drywall cost records is the fastest way to see which ones your team repeats.
Documentation That Protects the Bid
Quantities win or lose arguments based on how they were recorded. List the design number next to each rated wall quantity in the proposal, state the wall heights you assumed, name the board type you priced, and write down what the number excludes. Clarify whether firestopping, head-of-wall joint systems, and inspections are included, excluded, or assigned to another trade when those items apply.
Keep the marked-up plan and the source takeoff file. When a scope review or a change order arrives months later, the marked plan settles the question in minutes. A structured proposal format helps too, because a clean drywall bid template forces rated and non-rated quantities onto separate lines instead of a single blended total.
| Bid Line Item | Detail to State | Risk If Left Out |
|---|---|---|
| Rated wall quantity | Wall tag, design number, rating, assumed height | Quantity disputed with no reference point |
| Board type priced | Type X, Type C, or liner panel, with thickness | Substitution demanded at your expense |
| Finish and joint-treatment scope | Finish level and any required base-layer treatment | Unclear treatment may lead to a scope gap |
| Firestopping | Included or excluded, stated plainly | Scope assigned by default at buyout |
| Height assumption | Deck height or stated dimension | Plenum height absorbed as your cost |
When to Outsource Rated-Wall Takeoffs
Outside estimating support may be useful when bid volume exceeds in-house capacity, a project has many rated wall types, or the team lacks a dedicated estimator. If estimates on rated-heavy projects need extra review, check whether scope identification or pricing assumptions are contributing to the issue.
A useful outsourced deliverable on rated work includes the wall type matrix, quantities broken out by assembly, a material list, and the original software files so your team can verify and adjust. Anything less is a number without a defense.
Quantify North America offers drywall and ceiling estimating, along with flooring and painting services. Its drywall page lists PlanSwift, The Edge, and On-Screen Takeoff among the tools used for takeoffs. The company’s About page says founder Kathy Case began her career in commercial tile in 1979 and later worked as an installer, project manager, salesperson, and executive manager; it dates the company’s estimating-service development to 2019. For details on the handoff, see this overview of outsourcing construction estimating.
| In-House Takeoff | Outsourced Takeoff | Best Fit Scenario |
|---|---|---|
| Full control of assumptions and rates | Independent read of the drawings | Complex rated packages where a second read reduces risk |
| No external cost per bid | Cost per takeoff, no fixed overhead | Seasonal bid spikes |
| Limited by staff hours | Scales with bid volume | Multiple projects due the same week |
| Institutional knowledge retained | Quantities delivered with source files | Teams without a dedicated estimator |
For a rated-wall bid, a second review can focus on the wall-type matrix, quantities, assumptions, and scope exclusions. The drywall estimating service outlines what a review covers.
Frequently asked questions
What is a fire-rated wall assembly?
How many layers of drywall for a 2-hour fire rating?
What are the requirements for fire-rated walls?
Does a fire-rated assembly require fire taping between board layers?
Where can I find the design for a 1-hour or 2-hour fire-rated wall?
How do I calculate board quantities for a multi-layer wall?
Can I substitute Type C for Type X in a rated wall?
Key Takeaways
| Takeaway | Action for the Estimator |
|---|---|
| The rating lives in the tested assembly, not the board | Quantify by assembly type, one line and one unit cost per tag |
| The design number answers most questions | Read it and build the wall type matrix before measurement starts |
| Three numbers move the total | Deck height, layer count, and board type |
| Rated and non-rated walls price differently | Keep separate labor rates and never blend them into one figure |
| Documentation defends the quantity | State the design number, assumed heights, and exclusions on the proposal |
For a second read on the rated wall quantities in your next bid package, get in touch with the Quantify North America team.